Friday, February 5, 2010

Best Ever Hot Cocoa


It's been cold lately, hasn't it? We had another cold front sweep through last weekend, and I am officially out of my favorite hot cocoa mix - Ghirardelli's Premium Double Chocolate Hot Cocoa mix. The only place I can ever find it is Bed Bath and Beyond during the holidays, and I totally forgot to buy some this year. I looked online, and it seems the only way to buy it is either really expensive or by the case, which is just intimidating. So, instead, I decided to make my own cocoa mix.

It was ridiculously easy, and darn, it tastes good. Does it taste better than the Ghirardelli? It just might! So if you need a quick warm-up, make up a batch. It makes a great gift, and it also makes a great treat for yourself!

Best-Ever Hot Cocoa Mix

3 cups nonfat dry milk
2 cups confectioners' sugar
1 1/2 cups Dutch-processed cocoa powder
1 1/2 cups white chocolate chips
1/4 tsp salt

Combine ingredients in a large bowl. Working in two batches, pulse ingredients in food processor until chocolate is finely ground. Store in an airtight container for up to 3 months. To make the hot cocoa, stir 1/3 cup of this mix into 1 cup of hot milk. Top with whipped cream or mini marshmellows.

Wednesday, February 3, 2010

Shanghai Girls by Lisa See


I enjoy books set in China and Japan. Not entirely sure why - perhaps because they're so different and exotic to me. I read Amy Tan's The Joy Luck Club when I was 12 or 13 and just devoured it in a few days. I then read everything else I could find by her. I read Memoirs of a Geisha by Arnold Golden several years ago, and then proceeded to read everything I could find about geishas. I tend to get involved in these kinds of books as a phase of sorts. This book has been no different.

Honestly, I was attracted to the pretty cover of this book. It was propped up on the New Releases bookshelf, and I picked it up to look at it. I'd never read a book by Lisa See before I happened to pick this one up at the library. I've since picked up two more of her books at the library. I immensely enjoyed this book, though it is quite different from her previous novels, so if you're already a Lisa See fan, be prepared for a serious change in time period.

The book begins in Shanghai, shortly before WWII, and takes the reader on a journey through parts of China all the way to the U.S. during wartime and afterward. It's an incredible story. It was compelling, and gripping, and I certainly was anxious to finish it to find out what happened. Admittedly, there was a lot going on - lots of historical facts and a lot of plot points to keep straight - but I really enjoyed this book. I couldn't wait to read it every night. I definitely give it two enthusiastic thumbs up.

Now, I'm reading Snow Flower and the Secret Fan and then I'm reading Peony in Love, I think. I'll probably even look for Lisa See's nonfiction work, On Gold Mountain: The One-Hundred-Year Odyssey of My Chinese-American Family, at the library, too, as I'm sure it's also quite interesting.

Monday, February 1, 2010

Pizza Americana

I really enjoyed reading Peter Reinhart's "American Pie: My Search for the Perfect Pizza" - I love pizza, and have began to learn how to prepare it pretty darn well. Mr. Reinhart is best known, I think, for his amazing breadmaking book, The Bread Baker's Apprentice: Mastering the Art of Extraordinary Bread, which I keep meaning to pick up at the library. The book is split into three distinct sections, the first being "The Hunt,"where he travels to discover what makes for great pizza. I skipped right over that, and went straight to part two, the Recipes. I finally got a chance to try one of those recipes out recently, and I was pretty pleased.

I didn't realize that the dough is somewhat slow-rising, so I was awfully concerned about it turning out right, but it sure did taste good. He calls this dough a strong dough that can withstand heavy toppings, with a breadlike crust that's filling and tasty in its own right.


Pizza Americana Dough
makes four 10-ounce dough balls

5 cups unbleached high-gluten or bread flour
3 tbsp sugar or honey
2 tsp table salt or 3 1/2 tsp kosher salt
2 tsp instant yeast
1/4 cup olive or vegetable oil or solid vegetable shortening
1 cup whole or low-fat milk
3/4 cup room-temperature water (70 degrees)

1. With a large metal spoon, stir together all the ingredients in a 4-qt bowl or the bowl of an electric stand mixer until combined. If mixing with an electric mixer, fit it with the dough hook and mix on low speed for about 4 minutes, or until all the flour gathers to form a coarse ball. Let the dough rest for 5 minutes, then mix again on medium-low speed for an additional 2 minutes or until the dough clears the sides of the bowl and sticks just a little to the bottom. If the dough is too soft and sticky to hold its shape, mix in more flour by the tablespoonful; if it is too stiff or dry, mix in more water by the tablespoonful; it if is too stiff or dry, mix in more water by the tablespoonful. The dough should pass the windowpane test. If mixing by hand, repeatedly dip one of your hands or the spoon into room-temperature water and use it much like a dough hook, working the dough vigorously into a coarse ball as you rotate the bowl with your other hand. As all the flour is incorporated into the ball, about 4 minutes, the dough will begin to strengthen; when this occurs, let the dough rest for 5 minutes and then resume mixing for an additional 2 to 3 minutes, or until the dough is slightly sticky, soft and supple. If the dough is too soft and sticky to hold its shape, mix in more flour by the tablespoonful; if it is too stiff or dry, mix in more water by the tablespoonful. The dough should pass the windowpane test.

2. Immediately divide the dough into 4 equal pieces. Round each piece into a ball and brush or rub each ball with olive or vegetable oil. Place each ball inside its own zippered freezer bag. Let the balls sit at room temperature for 15 minutes, then put them in the fridge overnight or freeze any pieces you will not be using the next day. (Or, if you are making the pizzas on the same day, let the dough balls sit at room temperature in the bags for 1 hour, then remove them from the bags, punch them down, reshape them into balls, reutrn them to the bags, and refrigerate for at least 2 hours.)

3. The next day (or later the same day if refrigerated for only 2 hours), remove the balls from the refrigerator 2 hours before you plan to roll them out to take off the chill and to relax the gluten. At this point, you can hold any balls you don't want to use right away in the refrigerator for another day or you can freeze them for up to 3 months.

4. Preheat your oven to 450 with a baking stone on the bottom shelf for at least 30 minutes. Roll out your pizza on a piece of parchment, and then add your sauce and toppings. Brush the crust with olive oil. Slide the parchment onto your pizza peel, and slide onto the baking stone. Bake for 8-12 minutes, or to desired doneness.

Sunday, January 31, 2010

Menu Plan for February 1, 2010


Time is just flying by lately. I strongly suspect that's because Baby's second birthday is rapidly approaching. I can't believe he'll be two in just a few short weeks. At the same time, I'm excited to see him growing up and learning new things. It makes me so proud when he figures out how to put words together or how to do something that used to challenge him. All the same, I long for the days when I could just hold him and rock him and he wouldn't say, "Mommy, no!"

Speaking of no, food has become a serious challenge these days. For those of you wondering how often Baby eats these wonderful varied things I put in front of him, the answer is not very often, especially these days. He suddenly has a thing against straight spaghetti - I think maybe it's a little challenging for him to eat it, so he'd rather not. He'd rather eat Spaghetti-O's or fusilli or another shaped pasta. He also will randomly decide to despise his favorite foods. I try my best to keep my cool about it, because I know my getting frustrated won't help the situation, but it's ridiculously hard sometimes. And I'm sure it's only going to get harder as he gets more opinionated.

I'm really excited to try this cider braised pork chop recipe this weekend - I've been wanting to try it for a while and I keep forgetting about it. I love apple flavors with pork chops, so I suspect that will be a pretty yummy dinner. And Baby will probably refuse to it, of course...so the saga continues.

Monday - Brinner! Buttermilk Waffles
Wednesday - Meatloaf and Mashed Potatoes
Thursday - Spaghetti and Garlic Knots
Friday - Honey Soy Chicken and Rice
Saturday - Cider Braised Pork Chops and Mashed Potatoes (a new recipe!)
Sunday - Beer and Brown Sugar Marinated Steak and Roasted Potatoes (Life got in the way last week so we didn't have this last week, and darn it, I was upset about it! I love this steak recipe!)

Have a great week, and don't forget to visit Org Junkie if you need any menu inspiration, or if you want to share your menu too!

Thursday, January 28, 2010

Simple Tomato Sauce with Onion and Butter (and Garlic)

Sometimes, I'm a total follower when it comes to recipes - if I see a million bloggers blog about a recipe, I figure they can't be wrong. Sometimes, they are. This time, not so much. I've seen this recipe on several different blogs, most recently being Smitten Kitchen, one of my personal faves. This sauce has been raved about by many a blogger, and I must say, there's good reason. This sauce is ridiculously simple, and still very flavorful. Husband thought something was missing, but I think what he was talking about were the additional spices you're used to in a tomato sauce.

This was the first time I've ever made tomato sauce for pasta, and I must say, outside of the mess it created (splatters everywhere!), I definitely enjoyed the process, and will be trying again with another sauce soon.

You must make this sauce. Soon. It's so easy that anyone can do it, and it tastes wonderful.

On a side note, today is my blogoversary - I can't believe I've been blogging for a year! It's certainly flown by quickly - it just blows my mind that I've been doing this for a year already. I just want to thank all of you who read my blog, I appreciate the comments you leave and the support you give me every day. Thank you all!


Tomato Sauce with Butter and Onion
adapted from Smitten Kitchen and Marcella Hazan
Printer-friendly recipe

1 28-oz can whole peeled tomatoes, with their juices (use high quality ones like Muir Glen or San Marzano)
5 Tbsp. unsalted butter
1 medium yellow onion, peeled and cut in half
2 cloves garlic, peeled and smashed but not chopped
Pinch of sugar
Pinch of salt

1. Combine the tomatoes, their juices, the butter, the garlic and the onion halves in a medium saucepan. Add a pinch or two of salt and sugar. Place over medium heat and bring to a simmer. Stir occasionally, mashing tomatoes with the back of a wooden spoon. Cook, uncovered, at a very slow but steady simmer, adjusting the heat as necessary, for about 45 minutes, or until droplets of fat float free from the tomato.
2. Remove onion and discard. Blend tomatoes and in a food processor or blender, in batches if necessary, until smooth. Return sauce to pan and simmer until the thickness of the sauce is to your liking.
3. Taste and salt as needed.

Makes enough sauce for about 1 pound of pasta, or 4 servings

Wednesday, January 27, 2010

Mom's Banana Bread

Personally, I'm not a fan of banana bread. Most people love it. I'm not most people, especially when it comes to food. I'll eat an occasional banana, but put some bananas in a bread, and I'm just not interested. Sure, it smells good when it's baking, but there's something terribly unappealing about banana bread to me. Enough about my weird opinion of banana bread...

Husband, on the other hand, is a huge fan. Particularly if you warm up a slice and top it with some vanilla ice cream. He tells me that this is some truly awesome banana bread - and I will just take his word for it!

This is my mom's recipe, which she's been making just about all of her life, though the whole-wheat flour is a substitution I made. I think a little bit of whole wheat flour makes things taste heartier, which makes sense for banana bread. It's a very simple recipe, and I'll bet you've got most of the ingredients in your pantry right now! Happy baking!


Mom's Banana Bread

1 stick butter
1 1/2 cups all-purpose flour
1/2 cup whole wheat flour
1 teaspoon salt
1 1/2 teaspoons baking powder
3/4 cup sugar
2 eggs
3 very ripe bananas, mashed
1 teaspoon vanilla extract

1. Oven preheated to 350 F, grease a 9x5" loaf pan.
2. Mix together the dry ingredients in one bowl and cream the butter in another. Beat the eggs and bananas into the butter, then stir this mixture into the dry ingredients. Finally, stir in the vanilla.
3. Pour the batter into the prepared pan and bake for around 1 hour, but start checking earlier at about 45 minutes, until it passes the toothpick test.
4. Let cool in pan for at least 15-20 minutes, then take loaf out of pan. (I usually let the loaf fully cool before I take it out, but that's just because I usually forget!)

Tuesday, January 26, 2010

What's on My Nightstand: January


It's been a busy reading month this month, thanks to lots of good finds at the library. But the best thing I read all month, by far, was "The Help," which I re-read for my book club's meeting next month. I swear, that's the one book I tell people about these days, when people ask me for a book recommendation. It's such an amazing book. If you haven't read it, go to Amazon right now (because it's ridiculously cheap there for a hardback at $9.50), and buy it. You will thank me, I swear.

What I finished off this month:
1. Plan B: A Novel by Jonathan Tropper
2. Juliet, Naked: a novel by Nick Hornby
3. Twenties Girl: A Novel by Sophie Kinsella
4. Mrs. Astor Regrets by Meryl Gordon
6. Gourmet Today cookbook
9. The Help by Kathryn Stockett (again - a re-read for next month's Book Club meeting)

What I plan to read next month:
2. How to Talk to a Widower: A Novel by Jonathan Tropper
3. Roses by Leila Meacham
4. The Piano Teacher: A Novel by Janice Y.K. Lee

Monday, January 25, 2010

Hershey's Best Brownies

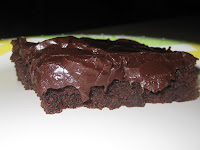
I like brownies. A lot. So much that I have at least 5 different brownie recipes that I alternate and make pretty frequently. Now I'm going to have to add one to this! These were awesome. I brought these to a moms' meeting I went to, and they were devoured. Husband even had one and loved it, and he's not a huge fan of all things chocolate. These were also super easy to make, so I highly recommend them. Big chocolate taste, fudgy texture, and frosting - you just can't go wrong with these brownies!! Seriously, you can slap chocolate frosting on just about anything and it will taste awesome.


Hershey’s Best Brownies
Printer-friendly recipe

Ingredients:
1/2 cup (1 stick) butter or margarine, melted
1 cup sugar
1 teaspoon vanilla extract
2 eggs
1/2 cup all-purpose flour
1/3 cup HERSHEY'S Cocoa
1/4 teaspoon baking powder
1/4 teaspoon salt
1/2 cup chopped nuts(optional)
CREAMY BROWNIE FROSTING(recipe follows)

Directions:
1. Heat oven to 350°F. Grease 9-inch square baking pan. Or, make an aluminum foil sling for your pan, and grease that (makes frosting and cutting the brownies a little easier).
2. Stir together butter, sugar and vanilla in bowl. Add eggs; beat well with spoon. Stir together flour, cocoa, baking powder and salt; gradually add to egg mixture, beating until well blended. Stir in nuts, if desired. Spread batter evenly in prepared pan.
3. Bake 20 to 25 minutes or until brownies begin to pull away from sides of pan. Cool completely in pan on wire rack. Prepare CREAMY BROWNIE FROSTING; spread over brownies. Cut into squares. About 16 brownies.

CREAMY BROWNIE FROSTING
3 tablespoons butter or margarine, softened
3 tablespoons HERSHEY'S Cocoa
1 tablespoon light corn syrup or honey
1/2 teaspoon vanilla extract
1 cup powdered sugar
1 to 2 tablespoons milk

Beat butter, cocoa, corn syrup and vanilla in small bowl until blended. Add powdered sugar and milk; beat to spreading consistency. About 1 cup frosting.

Sunday, January 24, 2010

Menu Plan Monday for January 25th

I've got some great new recipes coming your way this week, including my very first spaghetti sauce, which was quite delicious and extremely simple to make. I've also got some brownies coming your way, which are insanely yummy. I'm looking forward especially to making my beer and brown sugar marinated steak again, because that was so awesome the last time I made it. Super duper yum.

Monday - Brinner - IHOP Pancakes
Wednesday - Spaghetti and Garlic Knots
Thursday - Mom's Pork Chops (I will be sharing this recipe, though it's not new!)

What's on your menu this week? Do you need some additional inspiration? Visit OrgJunkie to find many, many more menu plans from bloggers all over the blogosphere!

Friday, January 22, 2010

Vanilla Buttermilk Cake

This was my first triple-layer cake, and honestly, I don't know that I'd do another one. One piece of a two-layer cake is heaven, but one piece of a three-layer cake was a bit much, even for me.

As you may remember, I'm on the hunt for the perfect yellow cake, and had heard that this one might just be it. It comes from the famed Sky High: Irresistible Triple-Layer Cakes cookbook, which I've heard nothing but wonderful things about, so I was really excited to give this recipe a try. I'll tell you this much - it definitely looked beautiful, but it didn't taste as awesome as I wanted it to.
The cake was a bit dry for my taste, though it was still tasty - I am looking for the perfectly moist, buttery, yellow cake to make for Baby's birthday next month. This, unfortunately, was not it. It was, however, a super cake and was a big hit at a recent dinner party I had. The frosting was not as awesome as I'd hoped for, either, now that I think about it, I've definitely had better fudge frosting, but this one sure did pipe pretty.

**UPDATE: I'm such a tool. I totally did make a three-layer cake before this one. The now-infamous Tiramisu Cake I made for Husband's birthday was my first three-layer cake. That tasted way better than this one.

Vanilla Buttermilk Cake
from Sky High, Irresistible Triple Layer Cakes by Alisa Huntsman and Peter Wynne

4 whole eggs
2 egg yolks
2 teaspoons vanilla extract
1 1/4 cups buttermilk
3 cups cake flour
2 cups sugar
4 1/2 teaspoons baking powder
1/2 teaspoon salt
2 sticks (8 ounces) unsalted butter, at room temperature

1. Preheat the oven to 350 degrees F. Butter the bottoms and sides of three 8-inch round cake pans or spray to coat with vegetable oil. Line the bottom of each pan with a round of parchment or waxed paper and grease the paper.
2. Put the eggs and yolks in a medium mixing bowl, add the vanilla and 1/4 cup of the buttermilk. Whisk to blend well.
3.. Combine the flour, sugar, baking powder, and salt in a large mixer bowl; whisk to blend. Add the butter and the remaining 1 cup buttermilk to these dry ingredients and with the mixer on low, blend together. Raise the mixer speed to medium and beat until light and fluffy, about 2 minutes.
4. Add the egg mixture in 3 additions, scraping down the sides of the bowl and mixing only until thoroughly incorporated. Divide the batter among the 3 prepared pans.
5. Bake the cake layers for 28-32 minutes, or until a cake tester or wooden toothpick inserted in the center comes out clean and the cake begins to pull away from the sides of the pan. Let the layers cool in the pans for 10 minutes; then carefully turn out onto wire racks, peel off the paper liners, and let cool completely.
6. To assemble the cake, place one layer, flat side up, on a cake stand or serving plate. Spread 3/4 cup of the frosting over the layer, right to the edge. Repeat with the next layer. Place the last layer on top and use all but 3/4 cup of the frosting to cover the top and sides of the cake. With an offset spatula, smooth out the frosting all over. Place the remaining frosting in a pastry bag fitted with a medium star tip and pipe a shell border around the top and bottom edges of the cake.

Instant Fudge Frosting
makes 5 cups

6 ounces unsweetened chocolate, melted and cooled
4 1/2 cups confectioners' sugar
3 sticks (12 ounces) unsalted butter, at room temperature
6 tablespoons half-and-half
1 tablespoon vanilla extract

1. Place all of the ingredients in a food processor and pulse to incorporate. Then process until the frosting is smooth.
Related Posts with Thumbnails