Thursday, December 31, 2009

Great American Cookie Company Style Chocolate Chip Cookies


The first thing I made in my brand new Kitchen Aid Professional series stand mixer is a new chocolate chip cookie recipe. I consider myself a bit of a chocolate chip cookie aficianado; in fact, I've toyed with the idea of making a new blog, a la The Brownie Project, dedicated to my attempts to find the best chocolate chip cookie recipe. Alas, not enough time.

I had intended to make a double fudge cookie as my first recipe for my new stand mixer, but I misread this recipe, and somehow managed to mentally add cocoa powder when I read it. This recipe probably would do well with the addition of cocoa powder, but since it was new to me, I didn't want to alter it the first time around. They are quite tasty, especially fresh out of the oven. Nice chew to them, with a nice caramel flavor. Definitely make sure to have a gallon of ice cold milk on hand to go with these cookies! I think they come pretty close to the flavor of the Great American Cookie Company cookies, though my big cookie scoop was M.I.A. when I baked these, so the size is certainly not quite right. If you grew up on those mall cookies, you will be a fan of these, definitely.

P.S. - If you're stopping by from Bake at 350's Flavor of the Month, thank you! If you need more of a holiday cookie fix, click here to visit my collection of Christmas cookie recipes from this year's Christmas Cookie Bonanza!


Great American Cookie Company Copycat Chocolate Chip Cookies

2 1/4 c flour
1 tsp baking soda
1 tsp salt
1 cup (2 sticks) butter, softened
3/4 cup granulated sugar
3/4 cup firmly packed brown sugar
1 tsp vanilla extract
2 eggs
3 cups of mix-ins (like chocolate chips, nuts, peanut butter chips, M&Ms, etc.)

1. Preheat oven to 350.
2. Mix flour, baking soda and salt in a bowl with a whisk.
3. Mix butter, sugar, brown sugar and vanilla in mixer bowl until creamy.
4. Add eggs and mix.
5. Gradually stir in flour mixture.
6. Add 3 cups mix-ins; stir with a wooden spoon to combine.
7. Drop batter by tablespoonfuls, two inches apart onto ungreased cookie sheets.
8. Bake 10 minutes or until golden. Cool on wire rack.

Wednesday, December 30, 2009

Tiramisu Cake

For the longest time, Husband has loved having an ice cream cake for his birthday. He grew up with the Carvel cakes, and in recent years always celebrated with an ice cream cake from Cold Stone Creamery. This year, though, I decided I needed to make his birthday cake. Perhaps because he was turning 30 and I felt this year needed to be special, or perhaps because I was sick of paying $25 for an ice cream cake that I didn't even like very much.  And I'm sorry, if a cake is coming into my house, darn it, I better like it!

Tiramisu is Husband's favorite dessert, by a mile. Nothing else really compares, except maybe peanut butter pie. When I started to brainstorm about what to make for his birthday, tiramisu was the one thing I kept coming back to, except for the fact that it intimidated the heck out of me for some reason. Then I stumbled upon Dorie Greenspan's tiramisu cake recipe on various blogs. I really was going to go that route. Until I found a copycat recipe that's even easier - it starts with a cake mix!

This cake definitely was a crowd pleaser, though it was mildly time-consuming to assemble. It was definitely NOT difficult, though, I would recommend it for any fans of tiramisu. It wasn't  much different than assembling your average layer cake. Best of all, even I liked the darn thing. And I'm not a fan of tiramisu, so that was definitely a pleasant surprise.  It combines the traditional flavors of tiramisu with some different textures that work really nicely together.  Definitely yum!


This cake got an official 9.5 Husband stars. He fully wants to start rating my cooking now, so we'll start here, I suppose. I will definitely make this cake again.


Tiramisu Cake the Easy Way
Printer-friendly recipe

CAKE:
1 (18.25 ounce) package moist white cake mix
1 teaspoon instant coffee powder
1 cup coffee
4 tbsp coffee flavored liqueur

FILLING:
1 (8 ounce) container mascarpone cheese
1/2 cup confectioners' sugar
2 tablespoons coffee flavored liqueur

FROSTING:
2 cups heavy cream
1/4 cup confectioners' sugar
2 tablespoons coffee flavored liqueur

GARNISH:
2 tablespoons unsweetened cocoa powder
1 (1 ounce) square semisweet chocolate

1. Preheat oven to 350 degrees F (175 degrees C). Grease and flour 3 (9 inch) pans
2. Prepare the cake mix according to package directions. Divide two thirds of batter between 2 pans. Stir instant coffee into remaining batter; pour into remaining pan
3. Bake in the preheated oven for 20 to 25 minutes, or until a toothpick inserted into the center of the cake comes out clean. Let cool in pan for 10 minutes, then turn out onto a wire rack and cool completely. In a measuring cup, combine brewed coffee and 1 tablespoon coffee liqueur; set aside
4. To make the filling: In a small bowl, using an electric mixer set on low speed, combine mascarpone, 1/2 cup confectioners' sugar and 2 tablespoons coffee liqueur; beat just until smooth. Cover with plastic wrap and refrigerate.
5. To make the frosting: In a medium bowl, using an electric mixer set on medium-high speed, beat the cream, 1/4 cup confectioners' sugar and 2 tablespoons coffee liqueur until stiff. Fold 1/2 cup of cream mixture into filling mixture.
6. To assemble the cake: Place one plain cake layer on a serving plate. Using a thin skewer, poke holes in cake, about 1 inch apart. Pour one third of reserved coffee mixture over cake, then spread with half of the filling mixture. Top with coffee-flavored cake layer; poke holes in cake. Pour another third of the coffee mixture over the second layer and spread with the remaining filling. Top with remaining cake layer; poke holes in cake. Pour remaining coffee mixture on top. Spread sides and top of cake with frosting. Place cocoa in a sieve and lightly dust top of cake. Garnish with chocolate curls. Refrigerate at least 30 minutes before serving.
7. To make the chocolate curls, use a vegetable peeler and run it down the edge of the chocolate bar.

Monday, December 28, 2009

Santa was very good to me this year...

I must say, Santa was very good to me this year. He brought me something I've coveted for quite a long time now - a brand new Kitchen Aid mixer, the professional bowl-lift model with the new spiral dough hook. I was positively speechless. Still am, to be honest. I came quite close to tears. Perhaps a picture will do it justice. It's such a thing of beauty. I can't seem to use it, though. Every time I start to make something in it, I think that whatever it is couldn't possibly be worthy of being the first thing I make in my new mixer. So, here I am, with a three day old mixer that hasn't been used. Oh, the horror! If only I could decide what to make first! BTW, I am fully accepting ideas. Give me some food for thought!


Oh yes, it's the Kitchen Aid Professional 600 Bowl Lift Stand Mixer. In the flesh.

Sunday, December 27, 2009

Menu Plan Monday for December 28th


It's time for the holiday cooking strike to end - I've had a good bit of time off from major cooking, what with all the massive holiday baking, but it's time that I get back to the grind. And by the grind, I mean the going back to preparing meals that take more than 10 minutes to prepare. Here's what's on the menu this week:

Monday: IHOP Pancakes and Eggs
Tuesday: Orange Honey Glazed Chicken (a new recipe - stay tuned!)
Wednesday: Spaghetti and Garlic Knots
Thursday: Meatloaf and Onion Roasted Potatoes
Saturday: Cider Braised Pork Chops (another new recipe - stay tuned!)
Sunday: Brown Sugar Beer Marinated Steak and Baked Potatoes (yet another new recipe - stay tuned!)

I know, three new recipes in one week is a smidgen ambitious, but it's the new year, and well, I'm feeling pumped at the moment about doing things differently (surely it won't last), so I'm going with it at the moment. Stay tuned for the new recipes to be posted next week! What's on your menu this week? Need more menu inspiration? Visit OrgJunkie for a mondo list of menus from all over the blogosphere!

Thursday, December 24, 2009

Merry Christmas!


Merry Christmas to you all and happy holidays! Have a wonderful day and my family wishes you a safe and happy holiday.

Wednesday, December 23, 2009

Master List of Recipes

Here are all of my recipes, sorted by category for ease of use. Enjoy, and please do come back to tell me when you try one, I love the feedback!!

Breakfast

Main Courses
Chicken with Mustard Pan Sauce
Crispy-Skinned Orange Chicken

Cookies and Brownies
Cupcakes, Cakes and Pies
Holiday

Tuesday, December 22, 2009

What's on My Nighstand: December

This was a good month for reading - I just started another Jonathan Tropper book, he's my favorite author at the moment. After this one, there will only be two more of his that I haven't read, so that's a little sad, but I'll survive. I happened to read "The Firm" this month, I'm sure I'm one of the last well-read people on the planet to read the darn thing. I enjoyed it, and it reminded me that on occasion, John Grisham can write a good book. I've been disappointed by a lot of his later works, but I've heard his newest, a collection of short stories, is quite good. I'll have to try to find that one at the library.

I didn't particularly enjoy "Dear John" - saw the trailer for the movie with a friend of mine when we saw "New Moon" last month, and thought I ought to read the book. It was okay, but it wasn't something I'd necessarily recommend reading.

I enjoyed "Push" but in a way that's kind of indescribable. I will never read it again, because it was a difficult read, due to all of the violence and abuse in the book, but at the same time, I'm glad I read it in a way because the growth of the main character was just astounding given her circumstances. I also went to see the movie with my best friend, and we bought cried our eyes out, it's one of the better fiction-to-film adaptations that I've seen in a while.

What I polished off this month:
1. The Book of Joe by Jonathan Tropper
2. Dear John by Nicholas Sparks
3. Push by Sapphire
4. The Firm by John Grisham

What I want to read next month (and this is all subject to change if Santa saw fit to bring me any books for Christmas!):
1. Plan B by Jonathan Tropper
2. 1-2-3 Magic: Effective Discipline for Children 2-12 - I started this recently and just haven't finished it, though I need to, as Baby's hitting the terrible two's early with a vengeance.
3. My Life in France by Julia Child
4. Juliet, Naked by Nick Hornby

Monday, December 21, 2009

Wilton Cake Class One: The Results


While I may bake a mean cake, I sure suck at decorating them. Always have. Husband was better than me at frosting a layer cake for a really long time. Recently, my best friend and I decided to take the Wilton cake decorating class, at the beginner level, naturally. It was a lot of fun - in part, because she and I are prone to get the giggles over silly stuff, but also because the class was just fun. Our instructor, Maureen, was a hoot - she's been doing this a long time, and her style of teaching was definitely from the school of hard knocks.

I did several practice cakes, at first with cake mixes, because I was making cakes so often that I just didn't have the heart to make a cake from scratch every darn day. But they taste so bad! Especially with the class buttercream frosting (a.k.a. CriscoCream). Yuck. Then I made a cake for Thanksgiving as a practice cake, with the Beatty's Chocolate Cake recipe (also known as the end-all-be-all chocolate cake recipe), and it tasted so good, I couldn't go back. From that point on, I made the cakes from scratch. I still have a plethora of box mixes in my pantry that I ought to donate.

The last class was definitely the hardest - roses are not my friends. I had a super hard time figuring out how to large make the rose base, and then how to pipe on the center of the rose. However, I totally rocked at piping rose petals, definitely. My roses didn't look perfect, by any stretch...in fact, they looked a bit more like carnations, with rough edges to my petals and all. I fully intend to try again on Husband's birthday cake this week, so stay tuned. My best friend on the other hand was kicking out cabbage roses like nobody's business, so I suppose I may call her to pipe a few roses on Husband's cake.

I still can't make my frosting look as smooth and perfect as a wedding cake, but I'm way better than I was when I started, that's for sure. I'd definitely recommend this class to anyone who enjoys decorating their baked goods, I've used a lot of the techniques I learned in cake class on my holiday cookies this year. Here's a few snaps from the cakes I practiced on and class itself:


Friday, December 18, 2009

Christmas Cookie Bonanza: Easy Cookies

These holiday "cookies" are kind of a running joke in my family. The original 3x5 card that my mom wrote the recipe on back in the day has a subtitle in parentheses - Not-So-Easy Cookies. This is because, much like the Peanut Butter Balls, Mom had the hardest time making these cookies pretty. You break them apart once they've cooled, much like a candy bark, and she could never make them break into pretty pieces. I'm not much better, but I don't think the pieces are as hideous as my mother used to say they were. Plus, these things taste so good, and they really are quite easy to make.

Easy Cookies

Saltines
1 cup butter
1 cup brown sugar
12 oz package chocolate chips and/or peanut butter chips

1. Line a jelly roll pan with foil. Layer with saltines (however many fit).
2. Boil butter and brown sugar together for 3 minutes. Pour over crackers.
3. Bake at 350 for 5 minutes. While baking, melt your chocolate chips.
4. Immediately top with melted chocolate chips. Let cool 1-2 hours. Turn pan upside down, peel foil off cookies and break apart into pieces. This is sometimes not-so-easy.

Thursday, December 17, 2009

Christmas Cookie Bonanza: Peanut Butter Balls

Peanut butter balls have a special place in my Christmas memories. I can remember making peanut butter balls with my mom growing up, and the big hissy fit that usually came along with making them. They used to piss her off, because she liked her baked goods to look perfect - and dipping the peanut butter balls in melted chocolate isn't exactly easy. It tends to make a mess, which would always make her upset. We tried dipping them with toothpicks, to make getting the balls out of the chocolate easier, which then left little holes in the bottom of the balls. Mom would try to fill the holes with chocolate, which sometimes made it look worse. Another year, she tried just dropping them in the chocolate and fishing them out with a spoon. That year, the balls didn't look so beautiful. These days, I either drizzle chocolate on top and skip the dipping altogether or use toothpicks. If you've got another method, I'm all ears!


Peanut Butter Balls
Printer-friendly recipe

16-18 oz peanut butter
4 c powdered sugar
1 cup soft butter
12 oz chocolate chips
1/2 cake paraffin wax

1. Mix peanut butter and sugar well. Freeze overnight.
2. Roll into balls.
3. Melt chocolate and paraffin together and mix well.
4. Dip the rolled balls in chocolate and place on wax paper to cool.

Wednesday, December 16, 2009

Christmas Cookie Bonanza: Slice and Bake Butterscotch Cookies


These cookies are ridiculously easy to make, and so pretty! If you're a fan of Cut Outs, but not a fan of the work to decorate them, this recipe is a great alternative!


Slice-and-Bake Butterscotch Cookies
adapted from Everyday Food

1 1/2 sticks (12 tbsp) unsalted butter, room temperature
3/4 cup light brown sugar
1/2 cup granulated sugar (for coating)
1 large egg yolk
1 tsp vanilla extract
2 cups all-purpose flour (spooned and leveled), plus more for paper
1/2 tsp salt

1. With an electric mixer, beat butter until light and fluffy, scraping bowl as necessary. Add 3/4 cup light brown sugar and beat until combined. Beat in egg yolk and vanilla, then flour and salt.
2. Transfer dough to a piece of lightly floured parchment or waxed paper. Using the paper so dough won't stick to your fingers, roll into a log, about 1 1/2 inches in diameter. Wrap well and twist ends of paper to seal. Refrigerate until firm, 60-90 minutes (or up to 1 week). Dough can be frozen up to 3 months. Place wrapped log into resealable bag, label and date.
3. Preheat oven to 350. When ready to bake, roll the log int eh 1/2 granulated sugar, or red decorators' sugar to coat, and cut into 1/4-inch-thick slices. Place on a baking sheet and bake until golden brown, about 15 minutes. Let cool 5 minutes, then transfer cookies to a wire rack to cool completely.

Tuesday, December 15, 2009

MSC: Gingerbread Cupcakes


Yay, it's cupcake time once again! The December MSC project was Gingerbread Cupcakes, and I must say, I wasn't looking forward to these. I'm not a super huge fan of gingerbread, never have been. My mother always made these ginger cookies for the holidays that she would roll in sugar that tasted okay, but I much preferred the chocolate cookies. Then again, I am an admitted chocoholic, so that should be no surprise.

I baked these cupcakes for a holiday party, and forgot to take a snap of the finished product, all frosted, but I did add a cupcake to our Christmas tree for a little while. It did look awfully adorable. I even used super cute cupcake liners, with Santas on them, but once that dark cupcake baked, they didn't look so festive anymore. Mental note, only use the super cute cupcake liners on lighter cupcakes!

Kayte from Grandma's Kitchen Table picked these cute cupcakes, which are meant to be adorned with fluffy vanilla frosting and a cute gingerbread cutout. Even though I don't have photographic proof, I'll admit to you all that I didn't make Martha's gingerbread cutout. I was going to, really, but I realized how much more cookie dough I still had to make for the holidays, and decided to go with some store-bought gingersnaps. They did look awfully cute, but you'll just have to take my word for it.


So that's another non-chocolate baking challenge completed. I really ought to make the inaugural cupcakes of our club, the Chocolate Salted Caramel ones that look so delicious in the book. On the bright side, there's a hint of chocolate on the horizon for us - in May, we're doing Martha's nod to the famous Hostess cupcakes, her Jumbo Cream-Filled Chocolate Cupcakes, which I'm totally looking forward to. Jess from Cookbook Habit picked them, and I'm so happy she did.

I'm also looking forward to March's selection, the Lemon Meringue cupcakes, which one of my favorite bloggers, Megan of My Baking Adventures, selected. I love Megan, and I especially enjoy her side blog, The Brownie Project. Husband is a super big fan of lemon meringue pie, and I've never made it for him. I know, it's on my things-I've-never-made-but-really-ought-to-try-once list this year, but in the meantime, the cupcakes will be a super nice treat for him.

Monday, December 14, 2009

Christmas Cookie Bonanza: Festive Fudge Cookies


I just started making these cookies a few years ago - I found the recipe on Betty Crocker's website, altered it a little bit, and fell in love with these! They're awesome and adorable when you use Hershey's Hugs, but they also taste amazing with Andes mints in the center instead. These also keep quite well, but if you do some with Hugs and some with Andes, make sure to store them in separate containers to avoid contamination!


Printer-friendly recipe

1/3 cup butter
6 oz unsweetend chocolate
1 14 oz can sweetened condensed milk
1 pouch sugar cookie mix
~60 Hugs candies, unwrapped**

1. Heat oven to 350 degrees. Nuke chocolate and butter in the microwave for one minute. Stir well until smooth.
2. Stir in condensed milk. Stir in cookie mix.
3. Shape dough into 1" balls.
4. Bake 6-7 minutes. Immediately press 1 candy into each cookie.
5. Let cool thoroughly before storing.

** Andes mints work super well in lieu of Hugs, I just cut them in half.

Sunday, December 13, 2009

Menu Plan Monday for December 14th


I'm hoping this will be a fun week - I turn 29 on Saturday, and I'm hoping that the Dinner Fairy will arrange to take me out to dinner. I sure don't plan to cook on my birthday. Usually, for my birthday and other various happy occasions, we go to my favorite Japanese restaurant, Kado, which serves traditional teppanyaki cuisine. It's my absolute favorite (hint-hint).


Monday - Buttermilk Waffles
Tuesday - Beef Teriyaki
Wednesday - Spaghetti and Garlic Knots
Thursday - BBQ Chicken on Garlic Toast
Friday - Glazed Pork Chops
Saturday - My birthday - NO COOKING!!
Sunday - Apple Maple Glazed Chicken (new recipe to be posted!)

Thursday, December 10, 2009

Christmas Cookie Bonanza: Holiday Cookie Jar Gifts


Cookie mix gifts are great. Not only are they easy, but for your friends who don't love to bake, it's a great way for them to have homemade cookies with a little less muss and fuss. That, and they really do taste good. If you've got someone on your Christmas list this year that you know has been good all year, they definitely deserve a nice cookie jar gift.

Chocolate Chip Cookie Mix in a Jar

1 3/4 cups all-purpose flour
3/4 tsp baking soda
3/4 tsp salt
1 1/2 cups (9 oz) semi-sweet chocolate chip morsels
3/4 cup packed brown sugar
1/2 cup granulated sugar

Combine flour, baking soda and salt in small bowl. Place flour mixture in 1-quart jar. Layer remaining ingredients in order listed above, pressing firmly after each layer. Seal with lid and decorate with fabric and ribbon.

RECIPE TO ATTACH:
Preheat oven to 375° F. Beat 3/4 cup (1 1/2 sticks) softened butter or margarine, 1 large egg and 3/4 teaspoon vanilla extract in large mixer bowl until blended. Add cookie mix and 1/2 cup chopped nuts (optional); mix well, breaking up any clumps. Drop by rounded tablespoon onto ungreased baking sheets. Bake for 9 to 11 minutes or until golden brown. Cool on baking sheets for 2 minutes; remove to wire racks to cool completely. Makes about 2 dozen cookies.

Wednesday, December 9, 2009

Christmas Cookie Bonanza: Snowballs

These are Husband's favorite Christmas cookie, by far. He loves these cookies, so I diligently make them every year. I'm not a huge fan, personally, but on the bright side, they keep well, so they're great for passing out to friends and family. It's a super buttery, melt-in-your-mouth kind of cookie, which I've also seen called Mexican Wedding Cakes or Melting Moments. This recipe comes from my mom's friend Betty, and it's better than any other snowballs I've had by a mile.

4 sticks soft butter
1 cup confectioners' sugar
1/2 cup cornstarch
1 tsp vanilla extract
3 cups all-purpose flour
1 cup chopped pecans

1. Cream butter and sugar with mixer or in stand mixer until light and fluffy. Add cornstarch and vanilla then flour. Beat at high speed until very fluffy, about 5 minutes. Stir in nuts with spatula or wooden spoon.
2. Drop by spoonfuls. Bake at 325 degrees for 20 minutes until edges just start to brown. Sprinkle confectioners' sugar on top. Move cookies to cooling rack, and once completely cool, dunk cookies in confectioners' sugar before storing. Or, roll into balls, refrigerate for at least 10 minutes to firm up, toss balls in a bag of confectioners' sugar.

Tuesday, December 8, 2009

Merry SITSmas!

Baby wishes you all a very merry SITSmas!

Merry SITSmas to you, all my SITSahs!

I'm hoping for several things in 2010. And in typical Type A Mommy fashion, I've made a list!

1. I'm going to have a consistent editorial schedule on my blog for more than just a few weeks. Really.
2. I'm going to try to do some creative writing in addition to my blogging. I've been saying for years (okay, really, since I was like 9) how I've wanted to write the Great American Novel, it's time that I valiantly try. And to help me get my creative juices flowing, I will be participating in Mama Kat's weekly writing meme, which I have said time and time I was going to do for the last several months.
3. In 2010, I'm going to try to cook several dishes I've always wanted to try my hand at but have been scared to try, like creme brulee. I'm working on my list still, and will have it ready by the first of the year, but suffice it to say, this little project will stretch my culinary skills in a (hopefully) nice way.

What are your plans for 2010, ladies? I'm sure whatever they are, they're awesome. I'd love to hear about them.

Need some holiday cookie recipes? You have stumbled upon the right place! I'm having a Christmas Cookie Bonanza, posting tons of tried-and-true holiday cookie recipes this month!

Never heard of SITS? Oh my! You must go visit Tiffany and Heather at the SITS Girls. Pronto. SITS has been one of the biggest chapters in my blogging journey, I've made some awesome bloggy friends, and it's true what they say - The Secret is in the Support!


Monday, December 7, 2009

Christmas Cookie Bonanza: Muddy Buddies


OK, so Muddy Buddies aren't exactly cookies, but they're still holiday fare, in my book. Some of my favorite holiday fare, actually. I've heard these yummy snacks also called dog food, but I can't eat something I call dog food, so Muddy Buddies works just fine. I happened to notice this recipe on the box of Chex a few years ago, decided to try it out, and I've been making them ever since. They're so tasty, you can't eat just one handful. These also wrap up really nice in a some cellophane with some pretty ribbon.


Chex Muddy Buddies
Printer-friendly recipe

9 cups Corn Chex, Rice Chex, Wheat Chex and Chocolate Chex (combination of your liking)
1 cup semisweet chocolate chips
1/2 cup peanut butter
1/4 cup butter
1 tsp vanilla
1 1/2 cups powdered sugar

1. Into a large bowl, measure cereal and set aside.
2. In a 1-quart microwaveable bowl, microwave chocolate chips, peanut butter and butter uncovered on High for 1 minute; stir. Microwave about 30 seconds longer or until mixture can be stirred smooth. Stir in vanilla. Pour mixture over cereal, stirring until evenly coated. Pour into 2-gallon resealable food-storage plastic bag.
3. Add powdered sugar. Seal bag; shake until well coated. (You may want to double bag, just in case, because wow, the powdered sugar really will make a monster mess if there's a hole in your bag!) Spread on waxed paper to cool. Store in airtight container in refrigerator.

Sunday, December 6, 2009

Menu Plan Monday for December 7th

Last week was horrible. I did an awful job sticking to my menu, in part because of some drama that popped up throughout the week, but also because I was awfully moody last week. I'm sure hoping that this week will be different. I'm only doing one new recipe this week, but I do have several more Christmas cookie recipes coming your way!

Monday - IHOP Pancakes
Tuesday - Spaghetti and Garlic Bread
Wednesday - Honey Mustard Chicken
Thursday - Chicken Teriyaki and Garlic Noodles
Friday - French Onion Soup
Saturday - Brown Sugar Barbecued Chicken
Sunday - Mustard Garlic Grilled Pork Chops (new recipe to be posted!)

Need your Christmas cookie fix? Click here!

Friday, December 4, 2009

Christmas Cookie Bonanza: Molasses Cookies


Molasses cookies are a classic at the holidays. One of the best things about this recipe is that the dough can stand in the freezer for a good period of time. It's an easy recipe to make ahead and toss in the oven when you have company coming over. Not only that, but they smell amazing when they're baking. Rolling them in sugar also gives them a nice look. My mom's been making this recipe for my entire life and it's always a hit when she shares her holiday cookies with her friends.

Soft Molasses Cookies

1 cup firmly packed brown sugar
3/4 cup soft butter
1/4 cup molasses
1 egg
2 1/4 cup flour
2 tsp baking soda
1 tsp cinnamon
1 tsp ground ginger
1/2 tsp ground cloves
1/4 tsp salt
3 tbsp sugar

1. Beat butter, brown sugar, molasses, and egg in large bowl with mixer. Stir in remaining ingredients, except sugar.
2. Freeze overnight, roll into 1/2" balls, and roll in sugar.
3. Bake 13-16 minutes at 325 degrees. Store in a tightly-closed container.

Thursday, December 3, 2009

Christmas Cookie Bonanza: Peppermint Brownies


Chocolate and peppermint go together nicely, don't they? These brownies are a super marriage between the two flavors and are always a hit. In fact, they were a hit last night at our holiday book club meeting, where we discussed "Nineteen Minutes." Not only are they tasty, but they're relatively easy to make and will please any chocolate lover you know.


Peppermint Candy Cane Brownies
Printer-friendly recipe

Brownies:
4 squares unsweetened chocolate (4oz)
1 cup butter (2 sticks)
4 eggs
2 cups sugar
1 tsp vanilla
1 1/4 cup flour
1/2 tsp baking powder

Frosting:
2 cup powdered sugar
4 tbsp butter, softened
1 tsp peppermint extract
1 tbsp milk
pink food coloring

Chocolate Glaze:
6 oz (about a cup) semi-sweet chocolate chips ,you could also use dark
6T real butter

Additional:
1/2-1 C crushed candy canes (Use Bob's)

1. Preheat oven to 350 degrees.
2. The chocolate you want is baking chocolate, which is sold in bars by the chocolate chips. Make sure it is unsweetened baking chocolate. Chop the squares a bit so they'll be easier to melt.
3. Then place them in a microwave-safe bowl along with the 2 sticks of butter (also chopped). Melt in 30-45 second intervals, stirring in between, until melted and smooth. Set aside.
4. In a stand mixer or with electric beaters, beat eggs for about 3 minutes until thick and frothy.
5. Add sugar and vanilla and beat to combine. Then add in the melted chocolate and butter that you set aside. Combine flour and baking powder and whisk into brownie batter by hand until just combined. Pour into a lightly greased 9x13 pan. If you want to make the job much easier, line your pan with foil first (I highly recommend this!)
6. Bake for 25-30 minutes. Test with a toothpick for doneness and don't over bake! When brownies are done, cool on a cooling rack. When completely cool, pop in the fridge to chill. (makes the frosting spreading easier).
7. Next, combine all frosting ingredients and beat until light and fluffy. Add extra milk by if you need a little more. Spread evenly over cooled/chilled brownies and place back in the fridge to chill again while you do the final step.
8. Place chocolate chips and butter in a microwave-safe bowl and cook in 30 second intervals until smooth.
9. Set aside for a few minutes, stirring occasionally, so it can cool off just a bit. Quickly spread on top of brownies. I say quickly because the frosting is cool and the chocolate is hot. If you dawdle too much and try to make the chocolate layer perfect, you'll make a big gooey mess. Just spread it on quick.
10. Crush the candy canes. Sprinkle the crushed candy canes on top and return to the fridge until chocolate is set on top.
11. Remove from fridge a few minutes before serving. Cut into squares, eat, ooh and ahh, and then eat another one. Or two. Or three. Whatever your limit is.

Wednesday, December 2, 2009

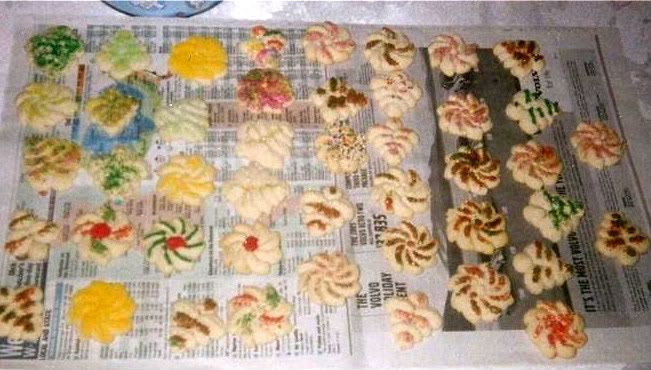
Christmas Cookie Bonanza: Spritz

Our next entry in the Christmas Cookie Bonanza is Spritz cookies, the kind of butter holiday cookie you make with a cookie press. Incidentally, I appear to own three of those handy goodies. And I only make Spritz once a year. I have apparently bought a cookie press every year the last few years, deeming the previous year's model not good enough, for whatever reason. And yet, I haven't come across any of the three of them as I've been working on unpacking my Christmas goodies this week. Maybe this is how I wind up buying a new one every year...

Anyway, Spritz are a tasty cookie that you can decorate, with piped on frosting, non-pareils and other sprinkles, colored sugars and so forth. I honestly like the taste of them without any decorations on them, but I rarely leave any without decoration. They just wouldn't be Christmas cookies without the beautiful decorations!

This is a tried-and-true recipe, I've used it since 2005 and always had wonderful results.

Photobucket


Spritz
Printer-friendly recipe

1 cup 10x sugar
1 cup butter
1/2 tsp vanilla extract
1 egg
2 1/3 cup all-purpose flour
1/4 tsp salt

1. Cream butter and sugar. Preheat oven to 400 degrees.
2. Add egg and vanilla.
3. Sift flour and salt together and add to batter. Mix thoroughly.
4. Use a cookie press and add cookies to ungreased cookie sheet.
5. Bake at 400 for 5-7 minutes.
6. Let cool fully before decorating.
7. To decorate, whisk some egg whites in a bowl, and get a paintbrush. Paint the area you want your sugars to stick to with your paintbrush, then either dip your wet cookie in sugar or sprinkle your sugar on top of your cookie, whichever floats your boat.

NOTE: Some people like to color their cookie dough instead of decorating with colored sugars and things.

Tuesday, December 1, 2009

The Book of Joe by Jonathan Tropper


It's no secret that I'm a fan of Jonathan Tropper. I happened upon a review of his This is Where I Leave You and suspected I would enjoy it. I did more than enjoy it, I loved it, and promptly began searching for the rest of his works. I think I have all but one at this point. The Book of Joe
was the next one that peaked my interest.

The premise of the book is that Joe, the protagonist, had some truly rough teenage years that he fictionalized in a book that not only hit the bestseller lists but also was made into a feature film. He is estranged from his family, and hasn't found a reason to head back to the hometown that he fictionalized, and subsequently infuriated in the process, until now. His return home is nothing short of notable. Between run-ins with past friends and acquaintances as well as his family members, the book takes you from hilarious to heartbreaking sometimes within a single paragraph.

While I suspected I would enjoy this book, I had no idea how much. This is definitely a good book, I would highly recommend it, especially to anyone who has a dysfunctional family or feels like the black sheep in the family.

Don't forget, I love book recommendations! Tell me what you're reading these days!
Related Posts with Thumbnails